A crumb coat is essential for achieving a professional-looking cake. It seals in crumbs and creates a smooth, even surface for your final layer of frosting or fondant. Applying a thin, steady layer and chilling the cake helps set the coat, making decorating easier. Proper technique guarantees a polished finish and prevents imperfections from showing through. Mastering this step sets the foundation for stunning cakes, and if you want to perfect your skills, there’s much more to discover.
Key Takeaways
- A crumb coat traps loose crumbs, ensuring a smooth, clean final surface.
- Properly chilling the crumb coat helps set the frosting for a polished look.
- Using a thin, even layer creates a strong base for final decoration.
- Applying the coat from top to bottom ensures all surfaces are sealed in crumbs.
- Mastering the technique results in a professional, flawless cake appearance.
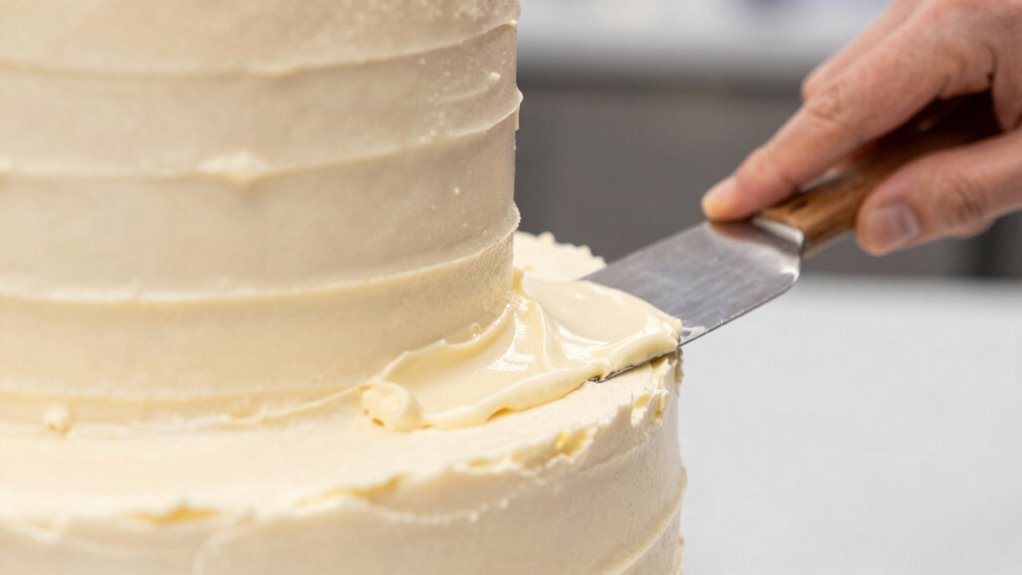
Ever wondered why your cake sometimes looks uneven or has crumbs in the frosting? The culprit is often skipping or rushing through the vital step called the crumb coat. The crumb coat is a thin layer of frosting spread over the entire cake to trap loose crumbs, providing a smooth surface for your final layer of frosting or fondant techniques. When you master this step, your cake decoration instantly looks more professional, and your final finish becomes much cleaner and more polished. Proper frosting techniques and patience are key to achieving a flawless finish.
To do a proper crumb coat, start with a well-baked, cooled cake. Cold cakes are easier to work with because they don’t crumble or shift as much. Use a spatula or an offset icing knife to apply a generous but thin layer of frosting over the cake. Keep your movements steady and smooth, working from the top down and ensuring you cover every surface evenly. The goal is not perfection at this stage but just enough to seal in the crumbs. Once you’ve applied the coat, place the cake in the refrigerator for at least 30 minutes. Chilling helps the frosting set and firms up the crumb coat, making it easier to add the final layer.
After chilling, you’ll notice a more solid base to work with. Now, you can proceed to apply your final layer of frosting or fondant techniques with much greater confidence. This step is essential for cake decoration because it creates a smooth, clean surface that enhances the overall look. If your crumb coat isn’t even or contains crumbs, those imperfections will show through your decorative layers, making your cake look amateurish. Taking the time to do a proper crumb coat reduces the need for multiple layers of frosting later, saving you time and effort. Additionally, understanding cake decorating fundamentals can help improve your overall results and make the process more enjoyable, especially when you learn how to smooth frosting effectively. Developing these foundational skills can also help you troubleshoot issues like uneven surfaces and achieve a more professional appearance. Remember, patience and consistent technique are crucial for mastering frosting application and creating a beautifully finished cake.

PUCKWAY Angled Icing Spatula, Stainless Steel Offset Spatula, Cake Spatula Set of 2 Black 6, 8 inch Blade
- Set Includes Two Sizes: 6-inch and 8-inch blades for versatility
- Ergonomic Non-Slip Handles: Comfortable, lightweight grip for precise control
- Multi-Purpose Use: Ideal for icing, cheese, pizzas, and more
As an affiliate, we earn on qualifying purchases.
As an affiliate, we earn on qualifying purchases.
Frequently Asked Questions
How Thick Should the Crumb Coat Layer Be?
You should apply a thin crumb coat, about 1/8 inch thick, to guarantee proper frosting adhesion without creating a thick layer. This crumb coat thickness seals in crumbs and provides a smooth surface for the final layer. Keep it light and even, working quickly to avoid excess frosting. A properly applied thin layer helps your cake look professional, prevents cracks, and ensures the final frosting adheres smoothly for a flawless finish.
Can I Skip the Crumb Coat for a Smooth Finish?
Skipping the crumb coat is like skipping the foundation of a building—it risks a shaky finish. For cake decoration and perfect frosting techniques, it’s better to include this layer. It seals in crumbs and creates a smooth surface, making your cake look professional. Without it, your frosting might sink into crumbs or crack, ruining your design. So, don’t skip it—your cake deserves that polished, flawless finish.
What Tools Are Best for Applying the Crumb Coat?
For applying the crumb coat, you should use a offset spatula or a bench scraper, which are essential tools for even cake decorating. A small, flexible spatula allows precise application, while a bench scraper helps smooth out the sides effortlessly. Make sure your tools are clean and heat-resistant. Good tool selection makes the process easier, helping you achieve a professional-looking cake with a smooth, clean finish.
How Long Should the Crumb Coat Chill Before Frosting?
Think of your cake as a blank canvas waiting for its masterpiece. You should chill the crumb coat for about 30 minutes to an hour, allowing the frosting to set like a firm foundation for your cake decoration. This baking tip prevents crumbs from sneaking into your final layer, ensuring a smooth finish. Patience here makes your cake look professional, turning simple baking into art.
Does the Type of Cake Affect Crumb Coat Techniques?
Yes, the type of cake affects your crumb coat techniques. For delicate cake flavors like sponge or mousse, you might need a thinner, more even layer to prevent damage. Heavier cakes, like fruit or carrot, can handle a thicker coat. Your decorating style also matters; smooth, elegant styles need a flawless crumb coat, while rustic or textured designs allow for a more relaxed approach. Adjust your method based on cake flavor and style.
PUCKWAY Angled Icing Spatula, Stainless Steel Offset Spatula, Cake Spatula Set of 2 Black 6, 8 inch Blade
- Set Includes Two Sizes: 6-inch and 8-inch blades for versatility
- Ergonomic Non-Slip Handles: Comfortable, lightweight grip for precise control
- Multi-Purpose Use: Ideal for icing, cheese, pizzas, and more
As an affiliate, we earn on qualifying purchases.
As an affiliate, we earn on qualifying purchases.
Conclusion
Now that you’ve mastered the art of the crumb coat, your cake is ready to don its flawless, glassy gown. Think of this step as laying a silky foundation—it’s the hidden brushstroke that transforms a simple cake into a masterpiece. With patience and precision, you’ve set the stage for a stunning finish. So, embrace this essential layer; it’s the quiet architect behind every professional-looking cake, turning your sweet creation into a work of art that’s as elegant as a well-composed symphony.

12 Inch Stainless Steel Cake Scraper, Leveler and Smoother, Icing Spatula, Perfect Tool for Icing, Frosting, Cream Edge. Adjustable Kitchen Spatula for Mousse, Cheese & Cream Cake
- Durable Stainless Steel Design: Precisely level and smooth cakes
- Versatile Decorating Tool: Create intricate designs and patterns
- Compact and Lightweight: Easily portable and storage-friendly
As an affiliate, we earn on qualifying purchases.
As an affiliate, we earn on qualifying purchases.

Kootek Aluminum Cake Stand Turntable for Party, Base Giratoria Para Pastele
- Heavy-duty Material: Made from durable aluminum alloy
- Smooth 360° Rotation: Built-in hidden ball bearings for easy turning
- Non-slip Surface: 12-inch non-slip surface with rubber feet
As an affiliate, we earn on qualifying purchases.
As an affiliate, we earn on qualifying purchases.