Choose a compact air fryer that fits your counter or storage space and can cook the portions you actually make. This guide is for first-time buyers and anyone replacing an appliance in a small kitchen. Set aside about 45-90 minutes to measure your space, compare models, and plan where the fryer will go. You will finish with a shortlist or a selected model, plus a safe location and a simple first-use plan.

Get kitchen gear delivered free with Prime
- Fast, free delivery on millions of items
- Prime Video, Amazon Music and more included
- Member-only deals all year

CHEFMAN 2 Qt Mini Air Fryer
- ✔ Capacity: 2 quarts
- ✔ Dimensions: 10 x 10 x 8.3 inches
- ✔ Weight: 5.9 pounds
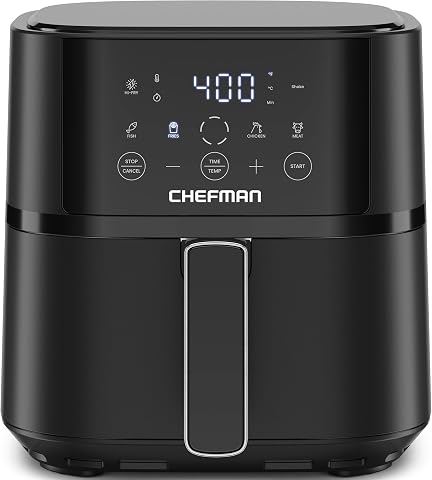
Chefman Air Fryer 4 QT Compact
- ✔ Capacity: 4 quarts
- ✔ Dimensions: 13.82 x 10.04 x 10.24 inches
- ✔ Weight: 7.5 pounds

Tastee Ceramic Air Fryer 5.5QT
- ✔ Capacity: 5.5 quarts
- ✔ Dimensions: 14.7 x 10.69 x 12.7 inches
- ✔ Weight: 10.6 pounds
Difficulty: Beginner | Time: 45-90 minutes
What You’ll Need
Tools & Materials:
- Tape measure or ruler
- Paper or phone notes for recording measurements and model details
- Access to product specifications or packaging
Knowledge:
- Basic familiarity with the meals and portion sizes you cook
- Ability to measure a counter, shelf, or cupboard
Check the appliance dimensions, including any handle, control panel, and space needed to open the basket. Product listings may show only the main body dimensions. Do not plan to operate an air fryer inside a closed cupboard or beneath a low shelf unless the manufacturer specifically permits it.
CHEFMAN 2 Qt Mini Air Fryer
When every inch of counter or cabinet space matters, the CHEFMAN 2 Qt Mini is the most direct fit in this lineup. Its listed dimensions are 10 by 10 by 8.3 inches, and its square basket is designed to make practical use of a small capacity. That makes it better suited to single portions, snacks, and meals for one or two than the 4-quart Chefman, which gives households more room but asks for a larger footprint.The touch controls let us set time and temperature up to 400°F, while the audible shake reminder helps prompt a mid-cook toss without requiring constant attention. Both the basket and rack are dishwasher safe, a helpful convenience when this appliance is used for quick meals. At 900 watts, it also has the lowest stated wattage of the three; the product details do not establish comparative cooking speed, so we would choose it for its small size rather than assume it cooks faster.The capacity is also its central compromise. A 2-quart basket can be limiting for multiple servings or larger ingredients, and cooking in batches may reduce the convenience of a quick meal. Compared with the Chefman 4 QT, this model gives up cooking room and the 450°F Hi-Fry finish. Choose it when compact storage is more important than batch size; skip it if you regularly cook for several people.
Pros:
- Smallest listed dimensions in this comparison
- Square 2-quart basket makes use of its compact interior
- Audible shake reminder and adjustable touch controls
- Dishwasher-safe basket and rack
Cons:
- 2-quart capacity can require cooking in batches
- Maximum temperature is 400°F, below the other models’ stated maximums
- Less suited to family meals than either larger pick
Best for: One-person households, couples making modest portions, and anyone who needs an air fryer that can fit in a cabinet between uses.
Not ideal for: Households that regularly prepare several servings at once or want a high-heat finishing mode.
Bottom line: We recommend the CHEFMAN 2 Qt Mini when freeing up kitchen space matters more than cooking a large batch at once.
“We recommend the CHEFMAN 2 Qt Mini when freeing up kitchen space matters more than cooking a large batch at once.”
Chefman Air Fryer 4 QT Compact
The Chefman 4 QT is the most balanced choice for small kitchens where “compact” still needs to mean enough food for a shared meal. Its 4-quart capacity is listed for two to four people, placing it between the 2-quart CHEFMAN Mini and the 5.5-quart Tastee. That middle ground can reduce the need to cook in batches without taking on the Tastee’s larger 14.7-inch depth.Its distinguishing feature is 450°F Hi-Fry technology, which raises the temperature during the final two minutes for a crisping finish. Four presets and touchscreen controls keep operation straightforward, and the audible shake reminder adds a practical cue during cooking. The basket and rack are dishwasher safe, and the listed weight is 7.5 pounds, so moving it for cabinet storage is a reasonable option to consider alongside its 13.82-inch depth.This model is a stronger everyday fit than the 2-quart Mini for households sharing meals, but it does not match the Tastee’s larger capacity, viewing window, smart probe, or broader set of cooking functions. Its product details list four presets rather than the Tastee’s 24, and its basket is identified as a no-window version. We see it as the best compromise between capacity and a manageable footprint, though cooks who prioritize the smallest possible appliance should choose the Mini instead.
Pros:
- 4-quart capacity sits between the smallest and largest picks
- 450°F Hi-Fry finish for extra browning
- Four presets and touchscreen controls
- Dishwasher-safe nonstick basket and rack
Cons:
- Larger and deeper than the 2-quart CHEFMAN Mini
- No viewing window listed
- Fewer presets and cooking functions than the Tastee
Best for: Small households of two to four people who want a practical everyday capacity and a crisping boost without moving up to the largest model.
Not ideal for: Shoppers who need the smallest appliance possible or want a viewing window, smart probe, and multiple cooking modes.
Bottom line: For most small kitchens that still need to serve more than one person, this 4-quart Chefman offers the strongest balance of size and everyday capacity.
“For most small kitchens that still need to serve more than one person, this 4-quart Chefman offers the strongest balance of size and everyday capacity.”
Tastee Ceramic Air Fryer 5.5QT
The Tastee 5.5QT makes sense when a small kitchen needs one appliance to cover more cooking jobs, or when several portions matter more than the smallest footprint. It offers the biggest capacity in this comparison, with an 8-in-1 setup, 24 presets, and a smart probe intended to monitor meat temperature. The viewing window also lets us check food without relying solely on a preset. These features make it more versatile than the simpler 4-quart Chefman, especially for cooks who expect to use functions beyond air frying.Its tradeoff is visible in the measurements: at 14.7 inches deep, 10.69 inches wide, and 12.7 inches high, it is the largest model here. In a narrow kitchen, depth can matter as much as countertop width, so measure the intended spot and the overhead clearance before choosing it. The 1,700-watt rating is also the highest listed, and the app is optional according to the supplied details. Buyers who prefer manual controls can still access the functions without using it.The ceramic-coated, dishwasher-safe basket adds an easy-clean option, while the 450°F maximum gives it the highest stated temperature in this group. However, anyone who mainly wants a compact, straightforward appliance may find the added modes and larger body unnecessary. Compared with the 4-quart Chefman, the Tastee wins on capacity and features but takes more space; against the 2-quart Mini, the difference is more pronounced. Choose it for versatility and larger batches, not for the tightest countertop.
Pros:
- Largest capacity in this comparison at 5.5 quarts
- Smart probe and viewing window support more monitored cooking
- Eight cooking functions and 24 presets
- Ceramic-coated dishwasher-safe basket
Cons:
- Largest listed dimensions, especially its 14.7-inch depth
- More controls and functions than a basic air-frying routine may need
- App features may be unnecessary for buyers who prefer direct controls
Best for: Small households that cook larger batches, want multiple cooking modes, and have enough counter or cabinet depth for a larger appliance.
Not ideal for: Buyers with very limited counter depth or anyone seeking a simple, smallest-possible air fryer.
Bottom line: Pick the Tastee when its larger capacity and added cooking tools justify the extra counter depth in your kitchen.
“Pick the Tastee when its larger capacity and added cooking tools justify the extra counter depth in your kitchen.”
As an Amazon Associate we earn from qualifying purchases.
Before You Start
Decide whether the fryer will stay on the counter or be put away after each use. A compact appliance can still feel bulky if it must be lifted from a high shelf or its cord has nowhere to go. Check the product manual for clearance, ventilation, and outlet requirements before choosing a location. Keep the fryer away from water, curtains, paper, and other items that can catch heat. Plan to use a wall outlet that meets the appliance’s electrical requirements; avoid an extension cord unless the manufacturer approves one.
Step-by-Step Instructions
Step 1: Measure the available space
Measure the width, depth, and height of the counter or shelf where you might place the fryer. If you intend to store it, measure the cupboard opening and the route you would use to lift it out. Mark the space needed to pull the basket fully open, and check the manual or product listing for the required clearance around the appliance. Write down the smallest usable dimensions.
Tip:Account for nearby cabinet doors, handles, backsplash edges, and the cord. A fryer may fit on a counter but still block a drawer or sit too close to an overhead cabinet.
Check: You have a written set of usable dimensions and have confirmed there is room to open the basket and leave the maker’s stated clearances.
Step 2: Estimate your usual portion size
List the foods you expect to cook most often and the number of people you usually serve. Include at least one typical meal, such as a portion of vegetables, reheated leftovers, or a small batch of frozen food. Decide whether you are comfortable cooking in batches when a meal will not fit in one layer.
Tip:Basket volume alone can be misleading. A wide, shallow basket may fit more food in a single layer than a narrow, deep one with a larger advertised capacity.
Check: You know the portion size the fryer needs to handle regularly and whether occasional batch cooking is acceptable.
Step 3: Set a practical budget and feature list
Choose a price range before comparing models. Write down the features you will use, such as a dishwasher-safe basket, a simple temperature dial, a digital timer, or a compact footprint. Separate those from extras you do not need, such as preset programs or multiple cooking modes. Check the price and availability of replacement baskets or trays if the maker sells them separately.
Tip:Prioritize easy cleaning and a basket shape that suits your food. A longer list of presets does not help if the basket is awkward to wash or too small for your usual portions.
Check: Your list identifies a spending limit, a few required features, and features you are willing to skip.
Step 4: Compare models by usable capacity and size
Find several models that fit your measured space. Compare their exterior dimensions, basket dimensions or capacity, and the maker’s suggested serving size. Check whether the basket is one piece or has a removable crisper plate, and look at how each part is cleaned. Read the manual or product specifications for operating clearance and temperature range. Remove any model from your shortlist that does not fit the space or portion requirement.
Tip:Product photos can make an appliance look smaller than it is. Use the listed measurements, and compare the basket’s usable surface rather than choosing by a capacity number alone.
Check: Your shortlist contains models that fit the available space and can handle your normal meals with a reasonable number of batches.
Step 5: Check power, noise, and everyday handling
Check the wattage and plug requirements against the outlet you plan to use. Review the manual for circuit or outlet guidance, especially if the kitchen shares a circuit with other high-power appliances. Look for reliable information about operating noise, basket weight, handle comfort, and whether the unit is easy to lift and store. Check the return policy and warranty before buying.
Tip:Do not assume a compact body uses little power. A small air fryer can draw substantial electricity while heating, so follow the maker’s electrical instructions and avoid overloading a shared outlet.
Check: You have confirmed that the appliance suits your outlet, can be handled comfortably, and has purchase terms you accept.
Step 6: Choose a model and plan its location
Select the model that best matches your measurements, portions, budget, and cleaning preferences. Before bringing it into use, choose a stable, heat-resistant surface near a suitable outlet. Keep the exhaust area clear and follow the exact spacing guidance in the manual. If you will store it between uses, choose a low, accessible place where the appliance can cool fully before you put it away.
Tip:Do not place the fryer beneath cabinets if its manual calls for open space above it. Hot air and steam can damage nearby surfaces.
Check: The fryer has a planned location with room for ventilation, basket movement, and safe access to the outlet.
Step 7: Prepare the fryer for its first use
Read the setup and cleaning instructions before plugging the appliance in. Remove all packaging, labels, and inserts that the manual says to discard. Wash removable parts as directed, dry them fully, and place the fryer on the prepared surface. If the manufacturer recommends an empty first run to remove manufacturing odors, follow its stated time and temperature while ventilating the kitchen.
Tip:Do not immerse the appliance body or use abrasive cleaners unless the manual permits them. Follow the maker’s care instructions for nonstick surfaces.
Check: All removable parts are clean and dry, packaging is removed, and any first-run instructions have been followed.
Step 8: Cook a small first batch and check the fit
Choose a familiar food and follow the package or recipe guidance, checking early because compact baskets can cook quickly. Arrange food with space for air to circulate, and avoid filling beyond the manual’s limit. Pause to shake or turn food only if the recipe or appliance guidance calls for it. When cooking ends, use the handle and place the hot basket on a heat-safe surface.
Tip:Steam and hot air escape when the basket opens. Keep your face and hands clear of the opening, and use tongs for food that is hot or crisp.
Check: The food is cooked to your preference, the basket handled safely, and the fryer fits its planned location during use.
Common Mistakes to Avoid
- Choosing by advertised capacity without checking the basket shape. — Compare basket width and usable cooking surface, then match those dimensions to the portions you plan to make.
- Measuring only the appliance body. — Include the handle, cord path, basket opening, and the maker’s required ventilation space in your measurements.
- Operating the fryer beneath cabinets or in a cupboard. — Use an open, stable surface and follow the manual’s clearance instructions every time you cook.
- Overfilling the basket to avoid cooking in batches. — Follow the fill limit and leave room for airflow. Cook separate batches when needed for even results.
Troubleshooting
Problem: The fryer fits on the counter, but the basket will not open fully.
Solution: Move it to a position with more front clearance, then check that the handle does not strike a cabinet, wall, or nearby appliance.
Problem: The food cooks unevenly or stays soft.
Solution: Reduce the amount in the basket, spread food into a less crowded layer, and shake or turn it if the recipe recommends that. Check the food before extending the cooking time.
Problem: The appliance will not power on.
Solution: Check that the basket is fully seated and the plug is firmly connected to a suitable outlet. Follow the manual’s reset or troubleshooting directions; stop using the unit if the plug, cord, or outlet appears damaged.
Problem: A new-appliance smell appears during the first run.
Solution: Turn the unit off if the smell is strong, smoky, or accompanied by visible damage. Otherwise, check the manual for first-use guidance, remove any remaining packaging, and ventilate the room as directed.
What Success Looks Like
You have a compact air fryer that fits its intended counter or storage location, meets the maker’s ventilation and outlet requirements, and has enough usable basket space for your typical portions. On a first test, it operates normally and cooks a small batch without crowding. You can open and remove the basket safely, clean the removable parts according to the manual, and store the cooled appliance where it remains accessible.
Next Steps
After each use, unplug the fryer if the manual directs you to, let it cool, and clean the basket and tray using the maker’s instructions. Wipe the exterior only as directed. Check the basket coating periodically and stop using a part that is damaged in a way the maker identifies as unsafe. If your cooking needs change, reassess whether the basket size still suits your portions before replacing the appliance.
Frequently Asked Questions
What size air fryer works in a very small kitchen?
Start with the measured space and the basket opening, then compare the usable basket area with your usual portions. A smaller-capacity model can work well for one or two people if you are comfortable cooking some foods in batches. Check exterior dimensions and clearance in the manual before buying.
Can I keep a compact air fryer in a cupboard?
You can store it in a cupboard if it fits safely and you can lift it without strain, but take it out before cooking. Use it only in a location permitted by the manual, with the required ventilation space. Let it cool fully before putting it away.
Do compact air fryers need a special outlet?
Check the model’s plug, wattage, and electrical instructions. Use a suitable wall outlet and follow any circuit guidance in the manual. Do not use an extension cord unless the manufacturer specifically allows it.
Is a compact air fryer enough for two people?
It can be, depending on what you cook and how much. Compare the basket’s usable surface with the food you prepare most often. If a meal cannot fit without crowding, plan on cooking in batches for better airflow and more even results.
How do I know if a model is easy to clean?
Check whether the basket and crisper plate detach, how the maker says to wash them, and whether those parts fit your cleaning routine. Review care instructions for nonstick surfaces and avoid assuming that a removable part is dishwasher safe unless the manual confirms it.